In this article, we are going to learn the step-by-step approach to do the setup of your AWS account to perform your cloud and data engineering operation efficiently on AWS.
Before doing step by step Setup of an AWS account, let us first understand the use and functionality of AWS is very important.
Here within this article, we are first going to be creating a new personal AWS account and then We will activate the account.
And finally, we will configure a budget alert so we can keep an eye on any changes that occur on our account. To create an AWS account and do require setup follow the below steps.
Step 1: Register and Create Account
So I’m here at the AWS home page, which is aws.amazon.com, and you can see in the top right corner there is the button to create an AWS account. Click on it and you will move to the sign-up page.

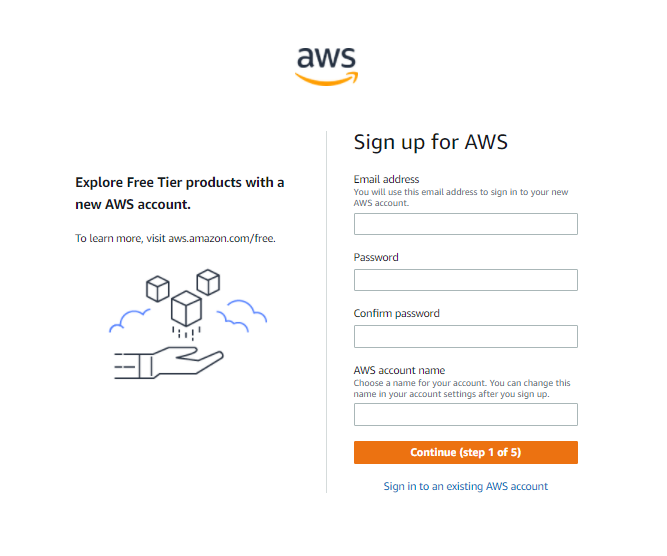
Now clicking on create button you will get this page. From here, you need to enter an email address, then a password, and finally, an AWS account name in the box for an AWS account creation.

Then if everything is correctly entered in the textbox, you can hit the Continue button below to proceed further.
Step 2: Signup with Complete Deatils
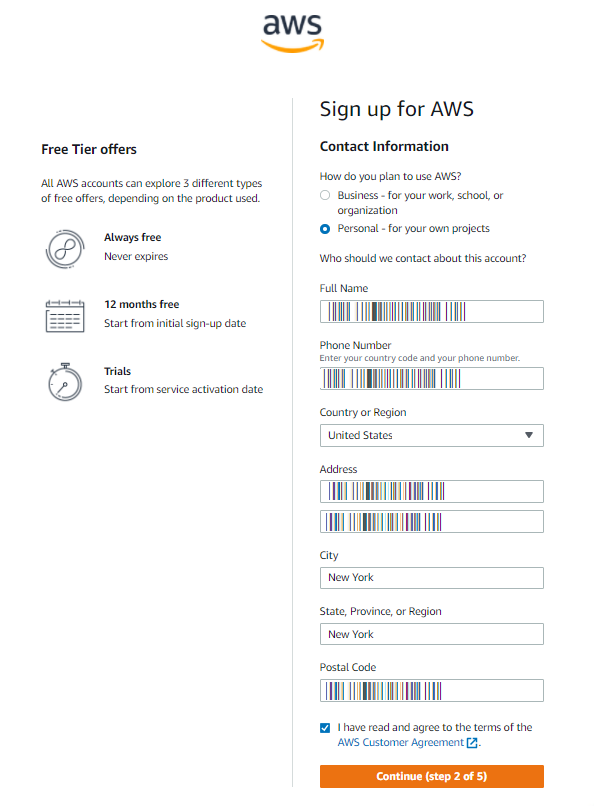
Nowhere in step 2, you will get this next page, then we need to select either a professional or a personal account type to set up an AWS Account.

Here, you can choose a personal account because most of us use a personal account to test AWS when we trying the first time.

So you need to enter in some additional information in the given text boxes, Now that you have those things in place, you are now going to check the option that says that I have read and agree with the overall customer agreement.
Then, click on the Continue button to Create an Account and Continue.
Step 3: Billing Deails
Now from here, the next step will be to enter in a credit or debit card number. It’s important to note here that AWS is a service that, using the resources, will cost you money; however, there are several services that fall under what we call the Free tier, which allow you to try them out before you’re actually charged for them.

Now the next step we’re going to take after we set up our AWS account is to set up a budget alarm so that you can make sure that there aren’t any unexpected charges that end up on your AWS bill. With that said, we are going to go ahead and enter a credit card number so that we can verify the account. we will then hit Verify and Add.
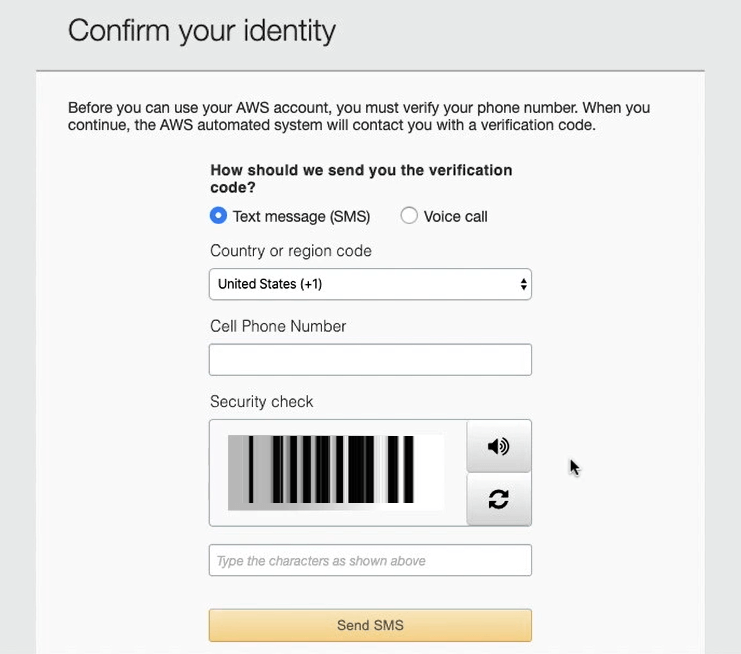
Now the next step is that we do need to confirm our identity, and so AWS gives you the option to either receive a text message or a voice call.

In this case, we will choose to have it just send me a text message. So first we need to enter the cell phone number, and then enter in the numbers from the security check.

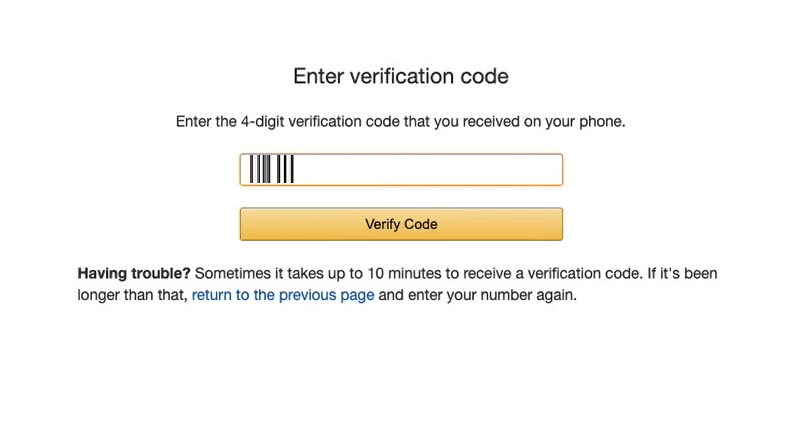
From here, AWS will send us/you a four‑digit code. we can enter that code in and then hit Verify. And now, our/your identity has been verified.
Step 4: Selecting a Support plan
The next step is to select the right support plan for AWS cloud operations.
Now there are paid support plans that are available, based on your business need you can choose the plan, nowhere you can simply select the Basic Plan, which is free.

Step 5: Sign In to AWS Console
Once this is in place, we can now go to sign in to the AWS console.

We need to use the email address that we used when we created the AWS account. Then we can hit Next. Then, we can enter our password and hit Sign in.

So now that we’ve ended up here in the console, we have created an AWS account and we have logged into the management console to be able to utilize it.

Step 6: Setup The Budget for AWS
Now before we do anything else, one of the first steps that we will take is to setup an AWS budget alarm for our account.
So you can navigate to the place where you see your name, and then you can select the My Billing Dashboard Tab. Click on it

From here, you can go to the left side where you can see the Budgets tab click on it,

Now here you can create a budget by clicking on create a budget button.

We’ll just have this be a cost budget because in this case, we’re just concerned with the overall cost. And we want to call this our Monthly Budget.

We want to have this be recurring, so even in future months, it would let us know if it went over this amount.

And we’re going to say that there is just a budget amount here of $20. So in this case, it would let us know if it is approaching that budgeted amount.
Once we have this in place, we can select Configure alerts.

We’re going to have it notify us if it gets to be 80% of the budgeted amount, which in this case would be $16 to $17.
Then, we can enter in the email contacts, and then from here, we can simply select Confirm budget for the budget creation process.

Now that we have this in place, we can now click on the below Create button to create the budget amount.

And now we’ve created a budget that will let us know if we get to within 80% of our budgeted amount during any single month.
Now you obviously can adjust this value to be whatever you want it to be, and if you’re only planning to leverage the Free tier.

You could choose to set this at a dollar or 2 and then have it alert you if it reaches within 50% of that specific target.
Similarly, you need to make sure that there are no more unexpected charges are added or selected on your AWS account while doing the setup.
So now your AWS account Setup is Done!!, Cheers, Start using the AWS services for your need.
Conclusion
Setting up an AWS Account is an easy process but choosing the right usage limit and budget is the crucial one to save the cost.
AWS cloud system is the best solution for your business and data engineering work to increase productivity and lower maintenance costs as compared to on-premises systems.
Recommended Articles:
What Is Cloud Computing? – Example, Components, Platforms
What Is Data Pipeline? Steps, Types, Components
What Are The Data Lakes? – Architecture, Usecases
What Is Databricks? – Components, Features, Architecture

Presenting the Data Engineer Team, a dedicated group of IT professionals who serve as valuable contributors to analyticslearn.com as authors. Comprising skilled data engineers, this team consists of adept technical writers specializing in various data engineering tools and technologies. Their collective mission is to foster a more skillful community for Data Engineers and learners alike. Join us as we delve into insightful content curated by this proficient team, aimed at enriching your knowledge and expertise in the realm of data engineering.


